

Verified against the Rust May 2026 build (April 30 mortars patch, Facepunch Studios). Costs and mechanics may shift with future updates — check in-game before farming for a specific design.
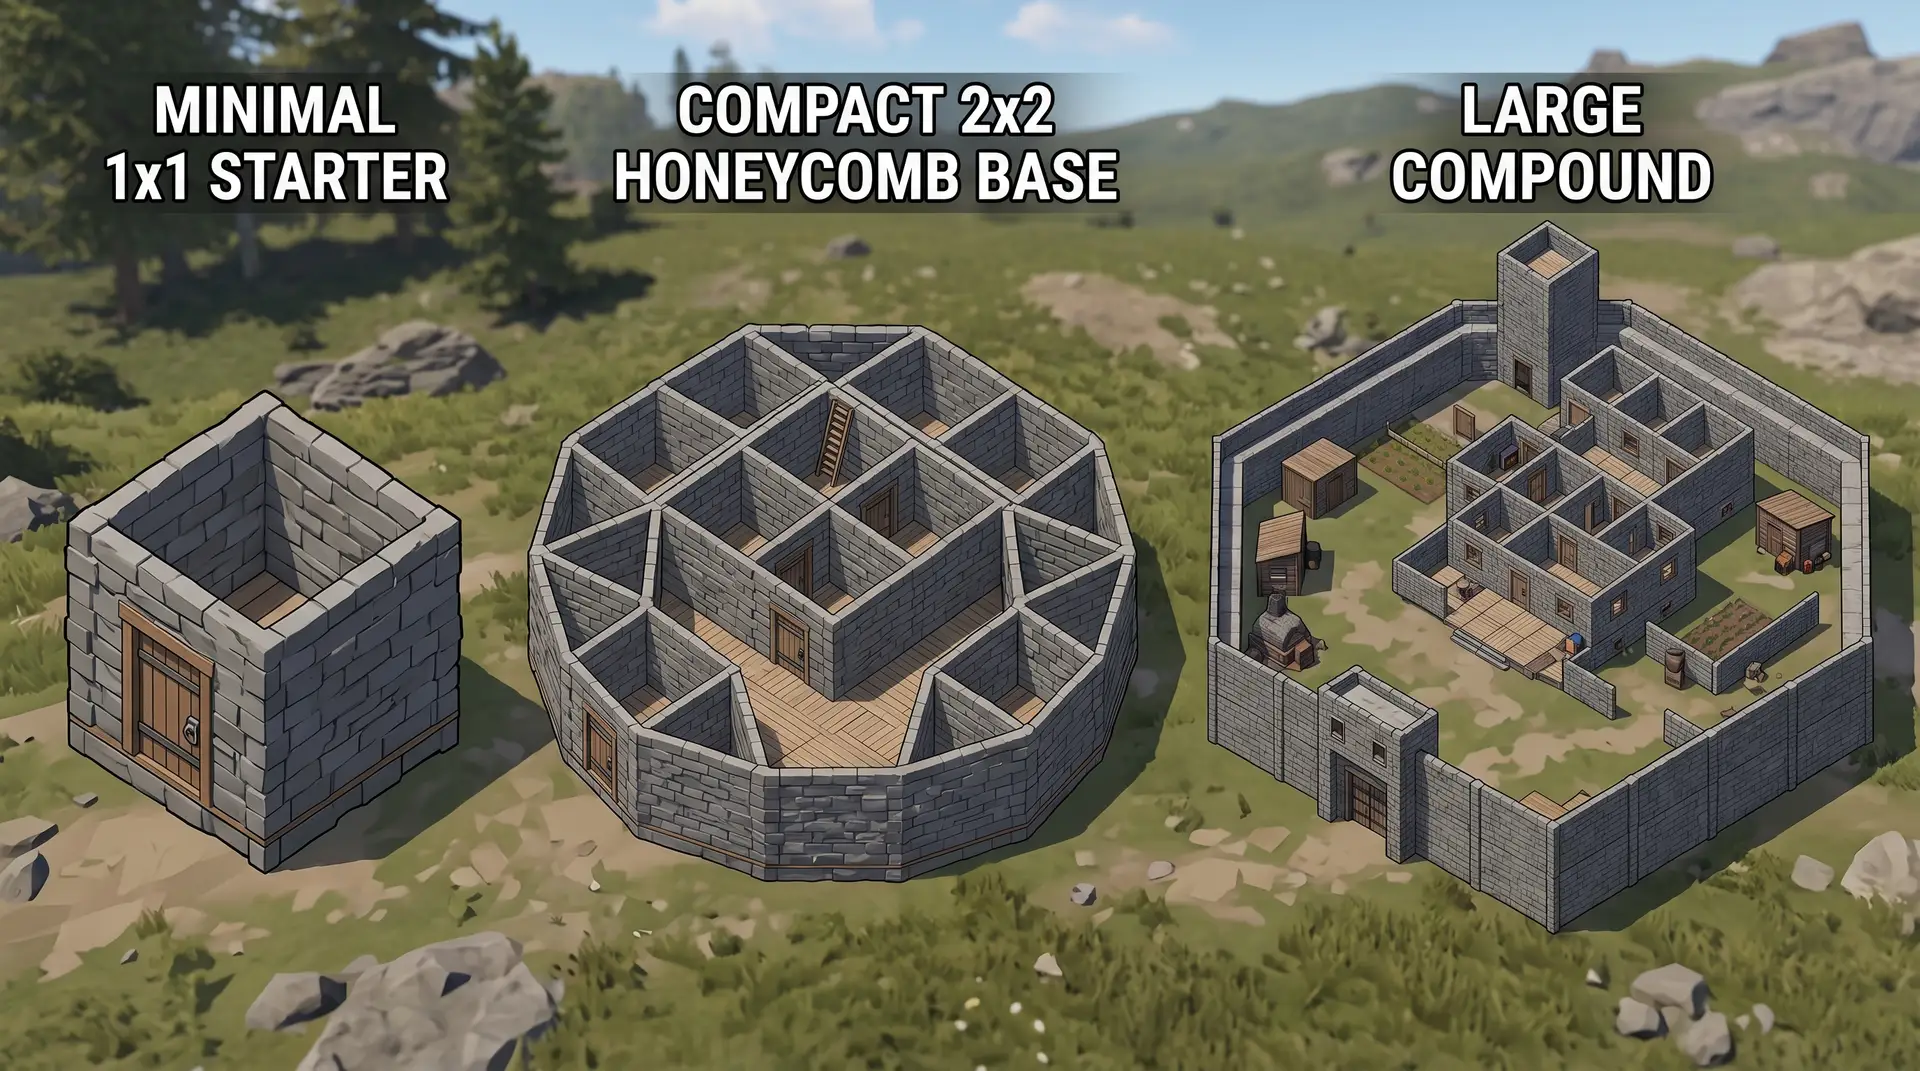
The base you choose on Day 1 shapes every hour of your wipe. Log off inside a 1×1 and there is a decent chance you come back to nothing. Log off in a properly built 2×2 bunker and a solo raider is looking at 16,000+ sulfur just to see your loot room. A clan compound pushes that number past 900 rockets — enough that most servers will not bother. This guide compares Rust’s three core base designs with exact build costs, verified raid costs, and clear decision triggers for when to move from one to the next.
Quick Start: What to Build First
- Place your Tool Cupboard first, in the corner of your first enclosed room — no TC means anyone can demolish your walls. Lock it and authorize yourself immediately.
- Build in stone from the start. Wood burns and takes pick-axe damage in minutes. Stone walls each cost 300 stone but require 4 rockets (5,600 sulfur) per face to breach hard-side.
- Add an airlock before honeycombing — two doors separated by a small room. A single airlock forces raiders to blow through two doors rather than rushing straight to loot.
- Skip the 1×1 if you can. Unless you are on the server within the first 10 minutes of a wipe, start with a 2×2 footprint. The resource difference is small; the raid resistance gap is significant.
- Upgrade your TC room to armored first. An armored wall costs a raider 15 rockets (21,000 sulfur) to breach — that single room upgrade prices out most solo and duo attackers before they even test your main loot.
The 3 Numbers That Define Every Base
Every base design can be evaluated on three numbers. Get comfortable reading them before you commit stone.
Build cost is the stone, metal fragments, and HQM you need to construct the base. Stone is the entry tier at 300 stone per wall piece. Metal roughly doubles your build cost but doubles the raider’s cost too. Armored is reserved for the TC room and inner loot room — walling an entire base in armored is a misuse of HQM for most player counts.
Raid cost is the sulfur a raider must invest to reach your loot room. A single stone wall costs 5,600 sulfur hard-side (4 rockets) or approximately 2,780 sulfur soft-side [4]. Each honeycombing layer forces the raider to breach one more wall before reaching your core. A base with two layers of stone honeycomb around a metal-core loot room can demand 30,000+ sulfur for a clean breach.
Daily upkeep is what the TC consumes to prevent decay. Larger bases fail not because they get raided — but because their owner runs out of farm to maintain them. A manageable 2×2 you can consistently upkeep beats a 3×3 that starts decaying mid-wipe because farming fell behind.
1×1 Starter Base — Day 1 to Day 3
The 1×1 is four stone walls, one floor, one roof, one door. A basic stone 1×1 costs roughly 1,600–2,000 stone to build and takes under 10 minutes from a fresh wipe spawn with nothing but a rock.
The core problem is exposure. A single door gives raiders one target: blow the door with 2 rockets (2,800 sulfur) and they reach your TC. No airlock means no second barrier. At ground level, a sofa placed by a raider lets them vault onto a flat roof and either drop inside or destroy your ceiling from above. The 1×1 forces a raider to invest as little as 5,600 sulfur for a confirmed breach — below the threshold most raiders on a mid-pop server consider unattractive [3].
The 1×1 has one legitimate secondary use: the decoy base. A visible 1×1 placed 150–200 metres from your real compound, seeded with low-value loot and a visible box or two, draws raider attention away from your main base. A raider who hits your decoy spends 5,000+ sulfur and an hour of their play session, then leaves. It costs you roughly 2,000 stone and a handful of junk items to construct.
When NOT to use it: Any time after Day 1, or on a high-population server. Experienced players scan specifically for 1×1s because the loot-to-sulfur ratio is the best target on the map. On a populated server, an unattended 1×1 is raided within hours regardless of material tier.
Upgrade trigger: As soon as you have 8,000 stone and basic scrap, move to the 2×2. For a solo this is typically Day 2–3. For a duo hitting resources together it can happen Day 1 afternoon.
2×2 Bunker — The Mid-Wipe Workhorse
The 2×2 bunker is the dominant mid-wipe design for solo and duo players, and it is where most experienced players live from Day 3 through end-wipe. It fits a workbench, research table, repair bench, large furnace, and up to 15 large storage boxes in its core while maintaining 6–7 doors between the exterior and the TC [2]. That door count alone pushes the raid cost to levels that deter casual attackers.
A basic honeycombed 2×2 runs approximately 8,000–10,000 stone for the external shell plus metal for doors and the inner TC room. The TC room and loot room walls should be upgraded to sheet metal before you sleep — a metal-core 2×2 forces raiders to spend 8 rockets (11,200 sulfur) just to breach the inner layer [3].
Build order:
- Place TC in the inner corner of your 2×2, lock it, authorize yourself
- Stone all 8 external walls immediately (300 stone each = 2,400 stone)
- Add airlock at your entrance — two doors, small room between them
- Expand one honeycomb layer around the perimeter (8–12 more stone walls)
- Upgrade TC room walls to metal or armored before logging off
- Add shooting alcoves on at least two sides for exterior defense
A fully honeycombed 2×2 with a metal-core loot room requires a raider to breach 3–4 walls to reach main storage — approximately 16,800–22,400 sulfur at stone soft-side rates, or significantly more against metal hard-side [3][4]. That threshold makes your base economically unattractive compared to smaller or weaker targets on the same server. As one Corrosion Hour analysis of the design notes, larger raiding groups targeting a well-built 2×2 “have the resources to raid a base twice this size” — making a full-group breach a net-negative efficiency decision [2].
When NOT to use it: If you have 4+ consistent teammates available from Day 1. A 2×2 bottlenecks your group’s loot output and creates unnecessary competition for storage. Once a stable group is established, the compound is the correct next step.
Clan Compound — Built for 4+ Players
A clan compound is not a single design — it is a framework: multiple TCs, multiple loot rooms, an external compound layer, and enough interior complexity that a raid team cannot locate your main loot room quickly even after breaching the outer wall.
Build costs scale aggressively at this tier. A well-documented large-clan base design requires 124,000 stone, 381,000 metal fragments, and 340 HQM to construct, with daily upkeep running 32,000 stone and 101,000 metal fragments [1]. That upkeep alone requires 3–4 active farmers. The raid cost to breach a clan compound of this scale hits a minimum of 900 rockets — approximately 1,260,000 sulfur — before reaching the core [1].
The critical design principle for clans: distribute loot across multiple TC zones. A raider who breaks into one bunker room should not find your team’s entire sulfur stockpile. Splitting loot across three or four TC zones forces a multi-day raid and often makes the compound economically unraidable mid-wipe.
The April 2026 mortar update changes external compound design at this scale. High external walls previously offered pure defense; post-mortar, they create a fixed target for raiders who can lob HE rounds over the perimeter before initiating a breach [5]. Clan bases are adapting toward lower-profile external structures with covered internal traversal routes — see the mortar section below for specifics.
When NOT to use it: With fewer than 4 consistent players. The upkeep alone will collapse a clan compound faster than a raid will. A solo or duo attempting to maintain 124,000+ stone in daily upkeep is grinding all wipe for a base that decays anyway when farming falls behind.
Raid Costs and Build Costs Compared
| Design | Approx. Build Cost | Raid Cost to Loot Room | Best For | Avoid If |
|---|---|---|---|---|
| 1×1 Starter | 1,600–2,000 stone | ~5,600 sulfur (1 wall + door, hard-side) [3] | Day 1 foothold; decoy base | Past Day 1 on any populated server |
| 2×2 Bunker | 8,000–10,000 stone + 1,500–3,000 metal frags | 16,800–22,400 sulfur (3–4 stone walls, soft-side) [3][4] | Solo/duo mid-wipe through end-wipe | You have 4+ consistent teammates daily |
| Clan Compound | 124,000+ stone, 381,000 metal frags, 340 HQM [1] | 900+ rockets minimum (~1.26M sulfur) [1] | Active clans of 4–8+ players, Week 2 onward | Fewer than 4 consistent players or low farm rate |
Raid costs calculated against stone soft-side and hard-side rates at 1,400 sulfur per rocket and 2,200 sulfur per C4 [3]. Clan compound raid data sourced from documented large-team base builds [1].
Which Base Matches Your Playstyle
| Player Type | Recommended Design | Priority Focus |
|---|---|---|
| New player (first few wipes) | 1×1 starter → 2×2 as fast as possible | Learn airlock and TC placement before anything else. Survivable beats ambitious in early wipes. |
| Casual solo (2–4 hrs/day) | 2×2 bunker, stone honeycomb, metal core | Upkeep manageability over max defense. A 2×2 you can sustain beats a 3×3 that decays mid-wipe. |
| Hardcore solo / optimizer | 2×2 with full honeycomb + armored TC room + decoy 1×2 off-site | Maximize raid cost per sulfur invested. Split loot between a main 2×2 and a decoy elsewhere on the map to force double-raid commitment. |
| Duo / trio | 2×2 expanding to 2×3 or 3×3 with external wall | Assign upkeep responsibilities per player before expanding. Each player covering one zone prevents the collapse that kills most duo bases. |
| Clan (4+ players) | Compound with multiple TC zones and distributed loot | Designate one player as upkeep manager. Unmanaged upkeep kills more clan bases than raids do. |
When to Upgrade: The Decision Framework
- Still in a 1×1? Move to 2×2 the moment you have 8,000 stone. This is Day 2 at the latest for any wipe.
- Getting raided out of your 2×2? Add honeycomb before upgrading size. Each stone wall layer costs a raider another 5,600+ sulfur — more efficient than expanding your footprint.
- 4+ players in a 2×2? Start the compound. Your team’s loot output exceeds what a 2×2 can store and protect efficiently.
- Clan compound decaying? You are over-built for your team. Downsize to a 2×3 with external wall rather than watching walls rot. An abandoned clan compound is a resource donation to every raider in render distance.
- New wipe, established team? Build a 2×2 bunker first for immediate wipe-day security, then construct the compound around it over the first 24–48 hours. Never start a wipe trying to build clan-scale immediately — you will be raided before the walls are up.
For settings optimization alongside your base strategy, our Rust best settings guide covers the visibility tweaks that help you spot raiders early, and our Rust low-end PC guide covers performance settings if frame rate is an issue during compound defense. For full wipe-day survival context, our Rust beginner’s guide walks through resource priority and first-week progression from spawn.
The Mortar Update: What Changes for Base Design in 2026
The April 30, 2026 Rust update introduced mortars at Workbench Level 2 with HE and fragmentation ammo [5]. This directly affects external compound design at clan scale — solo and duo 2×2 bunkers are unaffected.
Pre-mortar, high external compound walls were a pure defensive advantage. Post-mortar, tall walls create a predictable arc for raiders positioning a mortar at range. A raider with a WB2 mortar can lob HE rounds over your external wall and into open compound areas before initiating a breach — hitting exposed furnaces, outdoor crafting areas, and unroofed traversal routes.
Practical adjustments for clan compound design in 2026:
- Cover internal pathways — roof over high-traffic compound corridors to deny mortar arc shots targeting players moving between buildings
- Lower profile external walls — high perimeter walls help raiders calibrate mortar trajectories; lower walls reduce the predictable arc into your interior
- Move external furnaces inside — an exposed furnace farm is a straightforward mortar kill; move smelting indoors or under covered structures
- 2×2 and 1×1 builds are unaffected — the compact footprint of a bunker base offers no meaningful mortar target; this update changes clan compound design, not solo/duo meta
Frequently Asked Questions
What is the cheapest Rust base that is actually raid-resistant?
A 2×2 with one honeycomb layer in stone costs approximately 9,000–12,000 stone total and forces a raider to invest 11,200–16,800 sulfur to breach the inner layer soft-side. That is the best efficiency ratio available. A 1×1 is cheaper to build but costs a raider less than 6,000 sulfur to breach — the honeycomb layer on a 2×2 is the investment that prices out casual attackers, not the base footprint itself.
Should I build with metal from the start?
No. Stone is the correct Day 1 material even for experienced players. Metal quadruples the raider’s cost per wall (5,600 to 11,200 sulfur) but triples your own build cost and increases daily upkeep significantly. The better approach: build your full exterior in stone, then selectively upgrade the TC room and inner loot room walls to metal or armored. One armored TC room wall costs a raider 15 rockets (21,000 sulfur) [3] — that single upgrade does more for your defense than metal-walling your entire exterior.
How many rockets does it take to raid a 2×2 bunker?
It depends entirely on the raid path. A minimal soft-side breach through one stone exterior wall costs 4 rockets (5,600 sulfur). A properly honeycombed 2×2 with three wall layers between the exterior and loot room requires 12+ rockets on the cheapest soft-side path (16,800 sulfur minimum), before dealing with any doors [3][4]. The goal of a 2×2 bunker design is ensuring every possible raid path runs through at least two wall layers — there should be no cheap single-wall breach angle from any direction.
Can you realistically defend a base solo against a clan?
Not in a sustained online raid — a coordinated clan overwhelms individual defense regardless of base design. What a well-built 2×2 bunker achieves is economic deterrence: if breaching your base costs a 6-player clan 30,000 sulfur and 90 minutes, and your loot room holds 10,000 sulfur equivalent in resources, the raid produces a net loss. Solo base design is not about winning fights — it is about making the math unattractive for attackers.
What is the purpose of a decoy base?
A visible 1×1 or 1×2 with a few boxes and minor loot placed 150–200 metres from your main base absorbs raider attention before it reaches your compound. Raiders scan for targets by visible footprint and accessible entry points. A decoy 1×1 costs roughly 2,000 stone to build and draws raiders into spending 5,000+ sulfur and an hour on a base that yields low return — removing them from the server’s available raid pool for the rest of the day. On a mid-pop server, a decoy base near a high-traffic road is hit first almost every time.
Sources
- BisectHosting — Rust Base Building Guide: Best Base Designs for Solos, Duos, Clans, & More
- Corrosion Hour — The Defendable Solo/Duo 2×2 (corrosionhour.com/the-defendable-2×2/)
- XGamingServer — Rust Raid Calculator (2026)
- RustMods — RUST Raiding Guide: Raid Costs, Strategies & Pro Tips (rustmods.com/rust-raiding-guide/)
- Rustafied — Incoming Mortars, Workbench Upgrades, and More! (April 30, 2026)

I've been playing video games for over 20 years, spanning everything from early PC titles to modern open-world games. I started Switchblade Gaming to publish the kind of accurate, well-researched guides I always wanted to find — built on primary sources, tested in-game, and kept up to date after patches. I currently focus on Minecraft and Pokémon GO.